The archer was perched high in his aerial ambush. This set up was meticulously chosen and set up months before based on data gathered throughout the summer months on the local deer herd’s movement patterns. The wind was perfect for this ambush that resided on the downwind side of the main bedding area on the property. A 10 degree temperature drop overnight, a drastic wind direction shift and sky high barometric pressures all colliding on this crisp November morning in whitetail country caused the archer a blend of anxiety and excitement as he sat waiting for the sun to chase the darkness back into hiding.
The sound of crackling leaves under hoof grew louder in the familiar cadence of an approaching deer from the East. The archer’s movements in reaching for his longbow, rising to his feet, positioning his hands on the string all happened in one fluid motion with no conscious thought. As the buck entered the scene, the archer was poised and ready with tension on the string. The wilderness around him slowed down as the buck took that final step into the shooting lane. As the archer approached full draw, time stood still for a moment as his hand nestled into his anchor point. The string slipped from the archer’s fingers like it had thousands of times leading up to this fateful November morning.
The overwhelming emotions between predator and prey rushed over the archer as his quarry disappeared from sight as quickly as it had appeared. The arrow had hit it’s mark and the woods became silent and peaceful as he sat reflecting on what had just occurred…
If you’re a hardcore traditional bowhunter then you know exactly what the archer in this story was experiencing. We have all been there. This story is almost 100% universal when it comes to hunting with a traditional bow. Whether you’re hunting in a tree, ambush on the ground, or spot and stalking your quarry, the moment of truth from a physical aspect from bowhunter to bowhunter is eerily similar. Yet we tend to identify ourselves by one of two things. Our aiming methods or the style of bow we choose to shoot. We will save the latter for another time, so let’s focus in on the former; different ways we go about getting our arrows to impact the target through various aiming methods.
It never ceases to amaze me, that from the outside looking in, all traditional bowhunters essentially do the same thing from a physical standpoint to fire their weapons. We address the bow at two locations; the riser and the string. We draw. We anchor. We fire. However, when we dive into the minds of these archers, there are vast differences in the approaches. While none of these approaches are globally “better” than the other, they all may fit one facet of the sport or may even fit the individual archer better. The beautiful thing about traditional archery is that there is no right or wrong way to approach the single string bow… There are just ways that fit the individual archer better. Let’s review a few of these traditional archery aiming methods.
Instinctive Aiming:
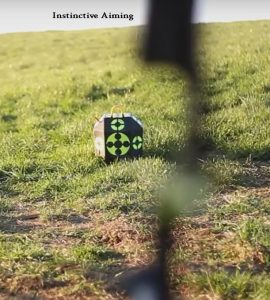 Instinctive aiming is arguably the purest approach to shooting a traditional bow. This method may seem simple by definition, but it takes much practice and athletic ability to master. Instinctive aiming is the process of allowing your subconscious mind to run every aspect of your shot, leaving your conscious mind to only do one very important thing, focus on the spot at which you want your arrow to impact. To your conscious mind, nothing else matters other than focusing as intensely on that spot as you possibly can. Through repetition and biomechanically learned behavior, your subconscious mind is running the physical side of your shot. The sight picture of the purely instinctive archer is so hyper focused on the spot he wants his arrow to impact, that all other visual distractions fade away into a blurry mess. The better you are at focusing and concentrating on that spot, the better opportunity the archer gives his subconscious mind to execute. Instinctive aiming is applicable to all games of archery. While concentrating intensely for 60 arrows in a row during an indoor FITA 600 round may be the chink in the armor of the instinctive archer, this method really shines in the unknown distance, fast paced, in your face, be ready for anything world of bowhunting with traditional tackle.
Split Vision Aiming
Split vision aiming is a happy medium between the instinctive and dedicated aiming methods, which we will discuss in a moment. The split vision aimer’s sight picture bounces back and forth between the spot he wants to hit at the target and his local sight picture. Local sight p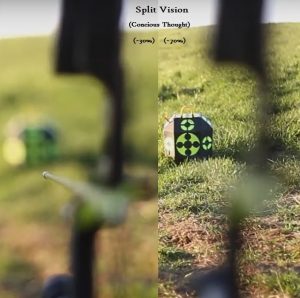 icture, meaning, his riser / bow hand / arrow tip.
The split vision aimer takes a moment while he is at full draw to give his sight picture a gut check with his conscious mind prior to entering into the conclusion of his shot process. Most of his conscious mind’s bandwidth is being consumed by the spot he intends to hit, however he decides to divert some of that bandwidth to his local sight picture to ensure nothing is grossly out of place. This check of the sight picture is best described as a conscious mental “feel” of the sight picture in relationship to the target. No further thought goes into it after the archer gives the shot the green light. From there the focus centers on the target intently, and the shot goes off.
Gap Shooting:
A gap shooter’s success is based on how well he knows his arrow’s trajectory and his focus on the relationship of his arrow tip to the target. A gap shooter goes through the process of mapping out his arrow’s trajectory, allowing him to know exactly where to place the arrow tip in relationship to the target based on the distance the archer is away from said target. Here’s a vid explaining Clay’s method of gap shooting.
The mapping phase is not difficult; you need nothing more than your current bow, arrows, a notecard and a pencil. Simply start at 5 yards away from the target. Draw and anchor as usual, and consciously place the tip of your arrow on the center of the target. (this process works well with a piece of horizontal tape across your target, and simply aim at the tape line) At 5 yards, your arrow will impact high. Measure the distance from the spot (or line) to the arrow’s impact. Repeat the process at 10, 15, 20, 25, 30, etc… As you move away from the target your arrow’s impact will change. Typically the distance between the arrow and the spot (or line) will continue to grow until you hit the peak of your arrow’s trajectory, also known as your maximum gap. From there your impacts (gaps) will then start repeating themselves on the way back down as you continue to move further from the target. Eventually the archer will reach a distance at which the arrow will impact the spot (or line) he or she is aiming at. This is called your point on distance. While shooting past the archer’s point on distance, the archer will have to place the tip of the arrow above the target, allowing the arrow to drop into the intended impact spot. Click here for a video explaining how to Find your Gap.
If at 15 yards, the archer’s arrow impacted 12” above the spot (or line) during the mapping phase, the archer will come to anchor, place the tip of the arrow 12” below the target, and the arrow will impact the center. Making a small note card with yardage and measured impacts for each yardage will help in learning the trajectory of your set up. Consciously placing your arrow tip below the target a set distance to ensure it will impact the center of the target is called setting a gap. At full draw in your sight picture, the distance from your arrow tip upward to the spot you want to hit is called your gap. If shooting at a distance further than the archer’s point on distance, the archer will have to place the tip of his or her arrow above the intended spot of impact. Consciously placing the tip above the target is called stacking. The mapping process is much the same past your point on distance, only the arrows will impact below the spot (or line) when mapping your trajectory.
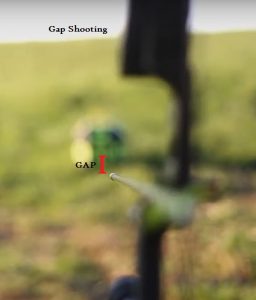 In a short amount of time (~100 arrows) your subconscious mind will store the trajectory of your arrows and the process of setting your gap will start to move from a very conscious thought process to more of a feel process. If the archer wishes, the subconscious mind can take over the process of setting the gaps; freeing the archer’s conscious mind from having to step through the thought process of “how far am I from target, what should my gap be?”. However, the archer has the option to keep this process in the conscious mind if he or she so wishes. Allowing this process to stay in the conscious mind lends itself to the competitive archer, however allowing the subconscious to take ownership over setting your gaps lends itself nicely to the bowhunter.
String Walking:
String walking, while an extremely effective aiming method, tends to come with a black cloud of scrutiny in the traditional bow hunting community. While its very common practice in the competitive arena, it is not very well understood or best suited for the bow hunter. However, it is a really fun way to approach the long bow or recurve, so below is a quick description of how to dive in.
String walking is the process of mapping out your arrow’s trajectory, much like gap shooting, but you’re mapping it on the back side of your shot. What is meant by that, is the sight picture will remain the same for the archer no matter the distance away from the target. The ti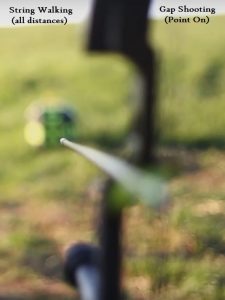 p of the archer’s arrow in his or her sight picture will remain on the intended impact spot on the target, much like the gap shooter’s point on distance. The archer moves his or her string hand up or down the string in relationship to the arrow nock. This movement up or down the string is called crawling down the string. What the archer is doing is changing the launch angle of the arrow as it clears the bow, effectively changing the arrow’s trajectory in relationship to the ground. To not overcomplicate this section, let’s just dive in to shooting your first shot using the string walking method.
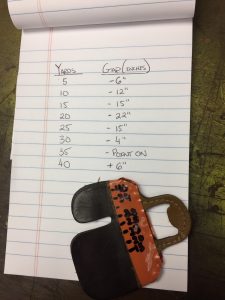
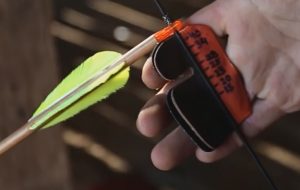
Simply place your string hand about an inch down the string away from your arrow nock. Draw the bow, anchor as you usually do, place the tip of the arrow on the target where you want the arrow to impact, and shoot the shot. Let’s assume the archer was standing 20 yards from the target. If the arrow impacted high, the archer would simply move his string hand down the string a little further for the next shot. Repeat this process until you’ve walked your way down to your 20 yard crawl. Reverse that if your arrow impacted low. (Raise your string hand until you find your 20 yard crawl) Repeat this process at various common distances. (i.e. 10, 15, 20, 25, 30) The rule of thumb is; far shots = string hand closer to arrow, short shots = string hand further away from arrow. If the archer is using a tab, he or she can simply mark the tab with some common distances as shown in the picture.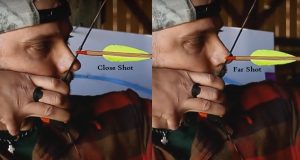
The benefit of this aiming method, while methodical and typically slow to execute, it allows the archer to have the exact same sight picture for every shot regardless of distance from target. (arrow tip covering the intended target) This method takes a little time and tuning to get right, but once the archer has it figured out it is a lot of fun… and quite accurate. One thing to mention is the similarity of the aiming method called facewalking. Essentially the archer is doing the exact same thing as string walking, changing the launch angle of the arrow for different distances. Instead of adjusting the location on the string he or she is addressing, the archer will change anchor points on the face to achieve the same results.
The importance of an archer’s aiming method will always play second fiddle to the importance of form and shot execution in traditional archery. Consistent, robust and repeatable form / shot sequences should always be the number one thing an archer focuses on perfecting. Aiming methods are as individual as the archers themselves. As stated above, no aiming method is right or wrong, however they may suit a particular archer or situation better. I suggest that each archer should at least be aware of the various aiming methods in the event he or she is faced with a situation that would allow the archer to pull a certain method out of the toolbox to implement. In future blog articles, we will review different ways to take some of these aiming methods and make them more applicable to hunting game with traditional tackle.
Shoot straight and get primal,
Matt Zirnsak – The Push Archery

Well done. Seems you have set a standard for folks who want to argue the merits of eac h method can use this as the basis from which to start.
Good piece on aiming. I appreciate offering the variety as opposed to presenting one way as the best way. Well done. Thanks for sharing your expertise. Best, david
Great summation of the different aiming styles. I appreciate that no one method was said to be better or worse, just maybe more advantageous to certain people or shooting situations. I guess I’m really a subconscious gap shooter. I just know I need to do more broadhead practice as sometimes the length, shape and orientation of the blades can throw me off some after shooting mostly field points.
Great information that’s well explained. Looking forward to the next post. Have a blessed week!!!
Thanks…again, this was very helpful to me, a ‘senior citizen’ , yet ‘new’ archer. I will add this to my list of things to practice and try out. Sincerely, Mikhail
I’ve tried point of aim , and other aiming methods . I have settled on Cherokee style three finger under instinctive aim as it was how Rick Welch taught me . I now teach my children and anyone else who will listen with an open mind . We all are on different roads that lead to one objective; consistency! Great article ! Now all we need is for someone to give a tutorial on Consistency and we’d be ” road ready “
There’s another aiming method, proposed and utilized by Longbow World Champion Larry Yien, which I’ve used with great success: Gapping at the bow. Everyone can pretty much hold their hand out at arm’s length and, using thumb and forefinger, show you an inch. I just can’t wrap my head around seeing/finding 14″, 15″, or 16″ at 25 yards so I hold the point of my arrow at fractions directly below the target. That’s how I set up all of my rigs to maintain consistency when shooting 3D and hunting. With a good fast bow your gap will be pretty constant, well within 10 ring accuracy at normal hunting and 3D ranges. After awhile you really don’t even think about it and your subconscious will make those small corrections for distance. All you have to do is focus on running your shot sequence…
Good comparison of aiming methods.
One comment on string walking…use a nock set above AND BELOW the nock. Only using a nock set above may cause the nock to push out of place when drawn with the hand down the string. A nock popping off the string a bit, then being fired, can effectively end up being a dry fire and damage bow limbs. Don’t ask me how I know! 🙁 The pictures didn’t appear to show a lower nock set being used.
Instinctive aiming is arguably the purest approach to shooting a traditional bow. — I have to agree with this statement but I do tend to think that instrictive aiming is one of the more difficult techniques to pick up.
Mike, Thanks so much for the note, and great catch! That bow was pulled off the rack to simply use as a demonstration of crawl differences. And your suggestion is absolutely accurate. Stringwalking (even 3-Under) creates downward forces on the back end of an arrow after the release. This downward force can not only slide the nock downward on the serving but can make it detach completely. A second nocking point below the arrow nock will prevent this and create a safe and accurate experience.
Good eye Mike Heaser!!
Michael, You are absolutely correct. We will be covering this method in the next article (Aiming for hunting) Gapping at the bow (or California Gapping) is an extremely effective way for archers to better perceive the gap and make it more usable in the field.
Stay tuned and thanks for the reply!